Business
Draw SpongeBob – Bit by bit Instructional exercise
Draw SpongeBob with only eight simple tasks! Typically, when something is famous, it keeps up with its prevalence for a long time before
Draw SpongeBob with only eight simple tasks! Typically, when something is famous, it keeps up with its prevalence for a long time before individuals continue toward the following thing. You may also learn many things cartoon drawing, scary drawing, cartoon drawing, cute drawing, flowers drawing, cute drawing, kids coloring pages puppy drawing, and dog drawing.
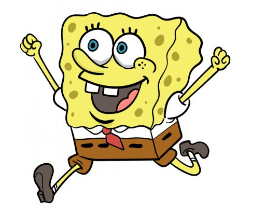
However, sometimes, that well-known one never appears to fizzle, and it’s valid for all ocean wipes: SpongeBob. This ecstatic wipe has been enchanting crowds, both youthful and old, beginning around 1999, and it indicates that things are not pulling back! To figure out how to draw a charming wipe, this is for you. This bit-by-bit instructional exercise on the most proficient method to attract SpongeBob 8 simple tasks will allow you to learn and have some good times drawing this beautiful person! the most effective method to draw Spongebob in 8 stages
The most effective process to draw SpongeBob is to begin! 1 stage
SpongeBob drawing: Stage 1 Let’s start this instructional exercise on the most proficient method to draw SpongeBob; we’ll begin with the eyes and nose. We should start with his nose. Its nose is highly lengthy and twists upwards when it moves. Whenever you’ve drawn a guide like this, you can add an eye from the left. While removing from the nose, attempt to remove however much as could be expected through the circle.
Make sure to leave a little space on the right half of the eye, as this is where the other eye will cut. Then, cautiously draw the eye on the right; however, leave some space in the lower right corner; at that point, define a bent boundary on the cheek. You can finish this step with three lines on every eyelash.
Stage 2: Next, draw the mouth and jaw.
Drawing SpongeBob, stage 2 It’s uncommon to see SpongeBob without a major grin all over, so we will add one to SpongeBob here. Initially, a little bent line is drawn from the nose. It should be extremely short and afterward go strongly to one side in one more bent line until it is under the jaw.
After you define this boundary, attract two square shapes to frame the appropriate teeth. You can then complete it with a bent line from the teeth to the edge of the mouth. Remember to give him a tongue! At last, draw the remainder of the cheek here and add three focuses to make spots. The bend under the mouth will give the jawline.
Stage 3: Presently, you can begin drawing his body.
Drawing SpongeBob, stage 3 The face is finished, so in this piece of our instructional exercise on the most proficient method to draw SpongeBob, we’ll begin with the body.
Even though it has a square name, SpongeBob is more similar to a three-layered square shape. For the time being, draw a square shape around his face, as you can find in the correlation picture. As may be obvious, you want to utilize a wavy line because the lines that make SpongeBob aren’t precisely straight.
Stage 4: Add more body and restrict.
Drawing SpongeBob, stage 4 To direct SpongeBob in this step, begin with a shirt and a tie. It will comprise three-sided and round shapes, and the bond will reach out from the reality of its body. When you have this, you can draw the sides of the body as displayed in the image. Please leave it smooth and bent aside, as his hand will go there later.
Stage 5: Presently give SpongeBob the shirt and jeans.
SpongeBob drawing: Stage 5 Now is the right time to spruce up SpongeBob! Let’s start with the sleeves of his shirt. They will be made of a few bent lines. The hand from the right will enter the space that was recently left, and the left hand will move directly from his body; Then, you can utilize a few straight lines to frame a rectangular shape and make his jeans. These lines will be refined, not normal for the lines of the body. Add more bent lines to her gasping legs, and you’re all set!
Stage 6: Agreement SpongeBob’s appendages.
Draw SpongeBob, Level 6 Your drawing of SpongeBob looks excellent! We will give him a few sections in this instructional training on the most professional manner to remove SpongeBob. His arms are exceptionally straight in the air, as can be made of two straight lines at the bent finishes of his clenched hands. The left leg will be straight, and the right leg will be bent to show that he is running. A glance at the picture will tell you the best way to utilize bent and straight lines to shape the shoes.
Stage 7: Then, at that point, attract each detail.
Draw SpongeBob, stage 7 Now is the right time to draw SpongeBob’s last step! Before continuing toward the shading stage, let’s add a few last subtleties. Utilize a few straight lines to isolate his shirt from his jeans, as you find in the image. Then, at that point, you can utilize thick, however little, dark square shapes to make an example to show his belt. At last, add a line over the shoes to show the socks.


Wasp Identification Guide: Learn How to Identify Different Wasp Species in Toronto
The Allure of Gravel: Why We Dig Voices with Grit
Ferdinand Berthier: A Pioneer in Deaf Education and Culture

Ultimate Guide to Obtaining an Indian Visa from Argentina

The Ins and Outs of Getting an Indian Visa from Cuba: